Table of Contents
- Before We Begin
- Which Strategy Should I Choose?
- How to Make a Quote for Translating a WordPress Site
- Translating WordPress System and Interface Messages
- How to Translate WordPress Themes and Plugins
- How to Translate the Content of a WordPress Site With WPML
- How to Translate a WordPress Site With Weglot
- Recap
- About WordPress
Publicly released for the first time in 2003, WordPress is one of the world’s most popular website creation platforms. Though created as a blogging system, over the years, WordPress has well and truly become a CMS where almost any type of site can be made.
However, despite its widespread use and the fact that the system has already been translated into more than 80 languages, making a WordPress site fully multilingual is not intuitive in the slightest: a certain amount of planning effort and good technical skills are needed to bring all the necessary elements together. Let’s take a look at the main concepts.
Before We Begin
First of all, in the case of WordPress, it’s important to remember that the system is not preconfigured to be bilingual or mutilingual, meaning that directly managing a multi-language site through the administration menu just isn’t possible. A webmaster will therefore have to choose the best methods for creating a multilingual site on a case-by-case basis. There are essentially four ways to make WordPress multilingual:
- by installing a relevant plugin, e.g. Polylang, or WPML, as explained below
- by creating a network of sites with WordPress Multisite, an integrated feature of the platform that requires no additional plugins
- by installing separate and independent instances of WordPress, with the original and translated site versions linked only through a language menu
- using a translation proxy system (for more, see our report Translating Websites with Translation Proxies).
If you choose to use a plugin, you should know that there are many of them out there, and not all of them follow the same logic. Here are the most common approaches:
- creating a post for each language, with the plugin then “connecting” the various translations (e.g. WPML or Polyang)
- including all the translations of the text within one post, with the plugin displaying one text or another depending on the language selected (e.g. qTranslate-XT)
- generating a page with the plugin from which the text can be translated (e.g. Transposh) and then saved internally
- connecting separate WordPress installations in Multisite mode using the plugin (e.g. Multisite Language Switcher).

This last configuration is a variant of the one above, which you can get even without a plugin. For more information, we recommend reading The No-Plugin Guide for a Multilingual WordPress Site Using Multisite.
Which Strategy Should I Choose?
There is no one right answer. Defining which localisation strategy is best will depend on what the site’s purposes are. If the translated content differs a lot from the original, for example, if the original-language site menu is different from those in other languages, perhaps because it has been decided that some parts are irrelevant to foreign audiences and should be omitted, then it may be better to translate post by post and page by page, and leave out material that won’t be needed.
However, if the original and translated sites are equivalent to each other, using a translation proxy system may be more convenient. As we will see in a later article, if the site makes extensive use of plugins and shortcodes, it would be more appropriate to use a system that can extract the translated strings and ignore those that cannot be translated.
In this article, we will outline a standard procedure for creating exact and complete site copies in another language, using two of the most trustworthy plugins around: WPML and Weglot. These plugins are able to discern all of a site’s translatable content, regardless of where it is stored, especially:
- system and interface messages
- User generated content
- Menus, buttons and CTAs
- Headers and footers
- Pages
- Blog posts
- Comments
- Metadata
- Tags and categories
- Themes
- Plugins
- Widgets
- External files
- Images
- Video
- Embedded code
Through these plugins, the process we will see assumes the use of a CAT tool to accomplish the translation and consists of creating copies of pages and blog posts in XLIFF or CSV format.
After that, these files must be downloaded offline or sent through a special connector to be processed by the CAT tool. Ultimately, the translations can be uploaded and posted to WordPress.
Before we start though, let’s go through some preliminary tasks that need to be completed before starting a site localisation project with WordPress.
How to Make a Quote for Translating a WordPress Site
Before installing a localisation plugin on your WordPress system, it’s best to get a sense of how much work is involved. Even though this won’t give an exact estimate, which is only possible by combining the plugin with a CAT tool, it will at least serve to get an idea of translation time and cost. Here are a few suggestions:
- do a word count of the source text documents, if the copywriting team have saved the content as text files (docx, Google docs, etc.)
- do a word count of an SQL export (XML database dump), by accessing the underlying MySQL database through PHPMyAdmin or by using a specific plugin
- export the content in WXR format from the WordPress administration interface. Like with the previous method, you will need to use a CAT tool that has been specially configured to interpret the format correctly
- use a specific plugin to count the words, like WP Word Count, which provides some statistics that are divided into subcategories
- do a word count of a static copy of the website by downloading the HTML files with HTTrack Website Copier, which is free and open-source, or WebCopy.

Exporting to XML or WXR can also come in handy for translating your site if it has been customized in a non-standard way and is therefore incompatible with translation plugins.
As far as external files are concerned (images, pdfs, videos) they must be counted separately and can follow the typical workflow of your translation provider or the translation agency you work with. Because of that, we will not discuss them here.
Translating WordPress System and Interface Messages
Continuing our digression here, let’s go through instructions on how to use WordPress in a language other than English.
From version 4 onwards, when WordPress is installed for the first time, a choice of site configuration language is included, but in this article, let’s imagine you need to activate this on an existing WordPress.
To install a new language you need to download the related language pack which is available for free from the community. This can be done on the administration interface: the available languages appear under Settings → General → Site Language.
Once you have set the default language, backend and system messages will appear in that language. When using a translation plugin, the plugin will manage this option by itself, and it will therefore be deactivated.
How to Translate WordPress Themes and Plugins
Theme and plugin developers sometimes provide their products with the texts already translated into some languages in Portable Object (.po) or Machine Object (.mo) file formats.
In such cases you won’t need to do anything as long as the new language is already present, but it will be detected and displayed when visiting the site in that language.
Still, keep in mind that these translations, like those of base systems, are done by the community or by the developers themselves, so it is always good to review them before publishing the translated site.
However, if the new language is not included in the plugin or theme package, there are two alternatives: translating the PO or MO files directly, or using the translation plugin, which should be able to detect and isolate the translatable texts along with other content.
The world of WordPress has no bounds, and it is impossible to cover every available combination of themes, widgets and pulgins. So, in order to limit all possible variables, we’ll take this as a typical scenario from now on:
- standard WordPress installation
- standard theme
- optional plugins from the WordPress Directory.
How to Translate the Content of a WordPress Site With WPML
WPML stands for WordPress MultiLingual and is one of the most comprehensive commercial plugins currently available for managing a multilingual website with WordPress.
The translation process with WPML is quite straightforward. WPML consists of a base plugin called WPML Multilingual CMS, and various add-ons which can be installed according to need. Especially the WPML Translation Management add-on, which is the most important of these as it allows translation tasks to be assigned, and their progress to be monitored.
The main capabilities of WPML are:
- detecting all content on the site, making it possible to translate pages, customized menus and even texts that make up part of the theme
- compatibility: all themes and plugins used by API WordPress work multilingually with WPML
- it is well documented (in multiple languages) with good support and a fairly active community
- it is SEO-friendly (URL display, validated structure).
Installing and Configuring WPML
WPML is installed like any other WordPress plugin. During the installation phase, the user is asked to do the initial configuration in 4 phases.
- Choosing the website’s default language.
- Choosing the language or languages you want to add.
- Choosing what order the languages will appear, what to do with untranslated content and other customized settings.
- Inserting the code to get automatic updates.
After this, you will have to define URL structure used by the website to display the multiple languages. This comes from the WPML screen on the administration panel, in the Language URL format section. There are three options to choose from:
- a separate domain for each language: a subdomain will be created for each language (for example:
name.comdisplays the site in English,it.name.comin Italian,de.name.comin German, etc.) - the language code entered as a parameter: the site URLs won’t be modified, but a parameter will be added at the end to indicate the language (for example:
name.comshows the site in English,name.com?lang=dein German,name.com?lang=enin Italian, etc.) - different languages in each directory: a directory will be created for each language installed, e.g.,
name.comfor English,name.com/de/for German,name.com/en/for Italian, etc.
How to Use WPML
The basic version of WPML creates separate posts or pages for each translation, so each item of content will have as many pages as there are active languages. By visiting the page or post section, a new column will be added for each line added to the site. Alongside each item of content, this column contains the + sign, which allows the same content to be created in another language using edit mode.

This can also be done by using edit mode with the original language content. On the right side of the screen there is a window for switching between languages. Click on the + symbol, and type in the title and the translated content in the new language to post the new page or post.
Warning! If the content is updated in the original language, you will need to enter the page in all other languages and make the same changes manually.
At the same time, it’s important not to change the original pages while the translation is in progress, as otherwise the link between the modified page and the relevant translation gets lost.

This procedure may work well for very simple sites that need translating into just one or two languages at most, but when the site consists of many pages, or translation into many languages is required, use the above-mentioned procedure using WPML Translation Management.
There are actually two ways to export pages: manual exportation, or assignment to a translation provider. The former works as follows:
- open the Translations screen, where you can find translation jobs
- choose the jobs to be downloaded in XLIFF format
- choose the XLIFF format version
- click Export
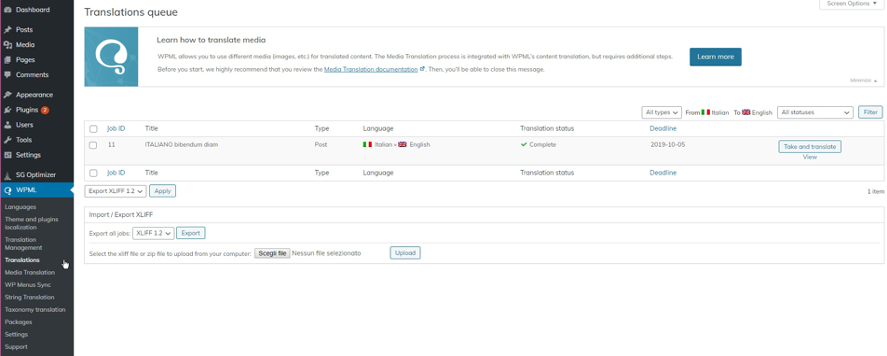
Once the translation is finished, the resulting XLIFF files need to be uploaded to the site once again: under WPML → Translations, by selecting the files on the disk and

Alternatively, WPML can send tasks directly to translators if they have been added to the Translation Management → Translation Roles display. In order to do this, the plugin needs to be configured to include the XLIFF documents to be translated as a ZIP attachment to notification emails: on the WPML → Settings page, open the Translation Notifications tab and select the Include XLIFF files in notification emails option.
Then send the files:
- content to be translated can be filtered and selected on the Translation Management menu
- choose the target languages and click Add selected content to translation basket
- open the Translation Basket to display the content
- here, you can choose the translator from the drop down menu and click Send all items for translation.

When the translations are ready, the translators can either upload the XLIFF files separately, or create a ZIP folder and upload them all together. If needed, the translators can repeat this task to update the existing translations.
Features of XLIFF Format Generated by WPML
If the XLIFF-generated files follow standard formatting, they will contain some WordPress-unique elements like additional data fields that correspond to categories, tags, and customized fields. All these special fields will appear as individual XLIFF fields. Even if the names assigned to them by WPML are self-explanatory, they can sometimes be unclear. If in doubt, we recommend asking the webmaster what the fields mean and, if necessary, excluding them from translation.
Another weak point of WPML is that it creates XLIFFs by simply inserting the content of an article into an XLIFF structure without mapping the inline content (tags or shortcode) in the correct XLIFF syntax. Everything gets inserted as CDATA.
There are two advantages to this approach:
- word counts contain untranslatable text (i.e. inline codes are not interpreted as such)
- translators will find these inline codes within the text as if it were editable/translatable text, which means there is a risk of deleting or accidentally changing them, etc.
Unfortunately there is no simple solution to this problem. You can use Rainbow (Okapi Framework), which allows you to change the files by treating the XLIFFs generated by WPML as simple XML files.
How to Translate a WordPress Site With Weglot
Weglot is another powerful WordPress localisation plugin which can be installed on the website that needs translating. As well as the plugin, Weglot provides a backend environment where translations can be managed, assign roles and translation jobs, and monitor all the available features, especially:
- online translation using a two-column translation environment (without CAT tool functions)
- visual editor on every page
- offline translation using the export and import XLIFF/CSV function.
How to Configure Weglot
Below is a step-by-step guide to integrating WeGlot into a WordPress site: first of all you need to register or log in to your Weglot account to get an API key.
- Create a new project by typing a name and choosing the site’s web technology and following the instructions on the screen.
- Copy the API key that you’ll need to activate the plugin within WordPress.
- On the site’s administration channel, click Plugins and install the Weglot plugin.
- Click the Activate button.
- To finish the installation, type the API key into the Weglot tab, and set the primary and target languages.
How to Use Weglot
After activating the plugin, go to the Translations section and click Add language to add a language combination. To avoid publishing incorrect machine translation online, deactivate the Make public option in the dialog box. This way you can preview the translation by going to the URL of the translated site and adding ?weglot-private=1 onto the end. If you want to pretranslate the site using automatic translation, leave the Display automatic translation option enabled, otherwise disable it.

To start editing the translated website directly, open the online editor (available in the Translations section) or use the visual editor directly on the web page in question.
However, translating offline means using the import/export function, which requires an Advanced or Enterprise subscription:
- go to the Translations section of the Weglot control panel and click on Export at the top right
- on the Export translation menu, select the file format, the translation format (usually automatic translation) and click Export to confirm
- a link to download the file will be sent to your email.

At this point, you can send the files to your translation provider. When the translations are finished, all that’s left to do is import them into Weglot:
- go to the Translations section of the Weglot control panel and click on Import at the top
- drag and drop the CSV or XLIFF files
- click Next and monitor the import results before clicking Import translations to apply changes
- when the process is complete, you will get a confirmation email.

Recap
Translating a WordPress website may present technical challenges if the site is particularly large or complex, or it has code-level customizations. The WordPress system is particularly hindered by the fact that from the offset, it is not designed to be multilingual and it’s necessary to use external plugins that guarantee 100% compatibility with all additional WordPress elements in theory, though direct experience shows that the reality is somewhat different.
In fact, this dependence can be a limiting factor, so in order to choose the best WordPress translation plugin for your specific needs, it’s always best to consult the experts. At Qabiria, we have years of web localisation experience, and we will guide you through the entire process, not only in the web translation phase, but from development to launch. Contact us for a non-binding quote.
On the other hand, however, WordPress’ strength is its wide distribution, so you are likely to find the solutions to common problems simply by googling them. However, if you plan ahead and take certain steps, translating a website will go much more smoothly and the results will certainly be better.
About WordPress
Free and open source, WordPress allows you to develop and distribute websites via a convenient administration interface. Thanks to the tens of thousands of add-ons and graphics themes available, we can create sites that go far beyond simple blogs without having to intervene at the source code level. E-commerce platforms, online magazines, showcase sites, service sites and even complex online apps can all be created using WordPress.
The over 60,000 additional components or plugins extend basic system functions not present in the native installation, while the so-called “themes” (so many as to be virtually impossible to count) are used to modify the site’s graphic appearance.
WordPress’ advantage of being so quick and easy to use has earned it a record: to be the most-used system in the world for website creation by far. According to W3Techs statistics(consulted in 2021), WordPress is used by over 64% of sites (at least for those for which the content management system used is known). Relating this figure to the total number of existing sites, it means that almost 40% of all websites use WordPress.