Table of Contents
This article originally appeared on Translator Tools by Stanislav Okhvat and is reproduced here with the author’s permission. Italian translation by Chiara Bertelli.
Introduction
One smart person once said that “a picture is worth a thousand words”.
As a translator, I can say that this was an exaggeration. I guess it should be something like “on average, a picture is worth a hundred words”. In this article, you will learn how to use a free image editor called Paint.NET to translate graphics - regular image files (JPEG, PNG, GIF, etc.), images in PDF files, and graphics embedded in other documents (e.g. Microsoft Word documents, etc.) It will also teach you the principles you can apply with any other image editing software.
Alternatives to using an image editor
One of the common methods of translating graphics is to use your word processor directly. In summary, you create text boxes with the translated text and position them over the original text.
This method has several advantages: you use only one tool (i.e. the word processor) and you can easily correct mistakes in the text at any point.
However, there are disadvantages: text is difficult to position precisely, it is very difficult to match background color of the text to the color on the original image, there are issues with grouping objects together, etc.
For those of you who are happy using the above approach, bear with me: I hope that after you finish reading this article, you will be able to use both approaches depending on the situation. For those of you who have never tried the above approach or think it is difficult, you should find image editors a lot of fun. And hey, you will also learn how to create a postcard or what not!
Selecting the right tool
Selecting the right image editor is very important. For the purpose of this article, I selected a free program called Paint.NET. Although this programme is free, it is very sophisticated and mature and is equally suited for simple and very complex image editing tasks. If you are interested in any other tools, take a look at the comparison chart at the end of the article.
To install Paint.NET, download the latest version from the program’s website. The installer will automatically download and install a correct version of Microsoft .NET Framework which is required by the program. If you want to install Paint.NET on a computer with an unreliable or non-existent internet connection, you will need to download Microsoft .NET Framework separately (the download link is provided in the System Requirements section).
Translation workflow
We will use the following workflow to translate graphics:
- Extract the image from the document (skip this if you already have a file in a graphical format, e.g. JPEG, GIF, PNG, TIFF, BMP, etc.) and open it in Paint.NET;
- Create two new layers: one to hide the original text (which we’ll call the mask layer), and another one to hold all translated text (the text layer).
- Insert the translation into the text layer.
- Modify the mask layer to hide the original text and match the original text background.
- Save the file in a graphical format and, optionally, Paint.NET native format (pdn).
- Insert the file in the word processor, etc. (skip this step if the original file was already in a graphical format, e.g. JPEG, GIF, PNG, TIFF, BMP, etc.)
1. Extract the image and open it in Paint.NET
To transfer the image to Paint.NET:
-
If the image is stored in a Microsoft Office document (Word, Excel, Powerpoint, etc):
- Select the image (by clicking anywhere inside it)
- Copy the image to the clipboard (Office 2003 or earlier: click Edit -> Copy; Office 2007 or later: click Copy from the Notes group on the Home* tab).
- Open Paint.NET and create a new file by clicking File -> New....
- In Paint.NET, click Edit -> Paste to insert the image from the clipboard. If you see a prompt that the image is too small, click ‘Expand canvas’.
However, Microsoft would not be Microsoft if this method worked perfectly. Sometimes, the image will not copy into Paint.NET correctly. To fix this, follow this procedure:
- Open Microsoft Powerpoint and click Edit -> Paste to paste the image from the clipboard (this time it will paste correctly).
- Right-click the image and choose Save as image... from the pop-up menu.
- Save the image in PNG or JPEG format (PNG format is better since there is no quality loss)
- Open the file in Paint.NET (
File -> Open... menu); - If you don't have PowerPoint, you can use the Print Screen key on your keyboard to copy the entire screen to the clipboard and then paste it into Paint.NET. Before pressing the Print Screen button, I suggest increasing the zoom level so that the image looks larger than it actually is. This will allow you to increase the print quality of the image in the translated document. Once you paste the image into Paint.NET, you will need to crop the necessary portion from the screenshot: use the Rectangle Selection tool from the Tools panel to select the image in the screenshot and then click Image ->Crop Selection.
-
If the image is in a PDF file:
- In Adobe Reader, click the image. The image should become selected (it will look shaded). You can also select a part of the image.
- Click Edit -> Copy to copy the image to the clipboard.
- Open Paint.NET and create a new file by clicking File ->New...
- Still in Paint.NET, click Edit ->Paste to insert the image from the clipboard. If a warning appears that the image is too small, select 'Expand surface'.
Note: the method just described will not work if the PDF file is protected (in which case the Copy command in the Edit menu will be disabled). Use the Print Screen button to copy the entire screen to the clipboard or request the image from your client.
-
If the image is in an OpenOffice document (Writer, Calc, Impress)
- Select the image, right-click and choose Save As Image... from the pop-up menu.
- Save the image in PNG or JPEG format (PNG format is better since there is no quality loss)
- Open the file in Paint.NET (MenuFile ->Open...)
As an example, I have copied the following graphic from a TV manual in PDF format:
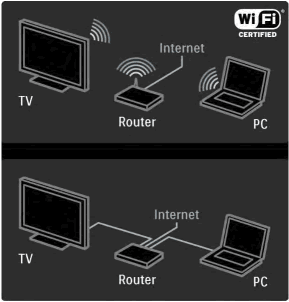
Figure 1: Original image extracted from a PDF
2. Creating new levels
Before we continue, let’s talk a bit about levels. If you are not familiar with this concept (hey, haven't you even heard Shrek’s famous speech about onions and ogres?), layers are used in most drawing programs to separate different types of graphic information and make images more manageable. You can see layers in such popular programs as Adobe Photoshop, Autodesk AutoCAD, Corel Photopaint, Paint Shop Pro, etc.
With layers, you can:
- Store different types of graphic data in different layers (in our case we will have a background layer with the original image, a mask layer that hides the original text, and a text layer that contains the translated text);
- Change the order in which the graphical data are presented (in our case, the text layer will be the top layer, with the mask layer below and the background layer at the bottom);
- Show/hide some data, etc.
In Paint.NET, layers are manipulated using the Layers panel (click Window -> Layers if you don't see it). Using the Layers panel, you can add, delete, reorder, hide/show, rename, and merge layers.
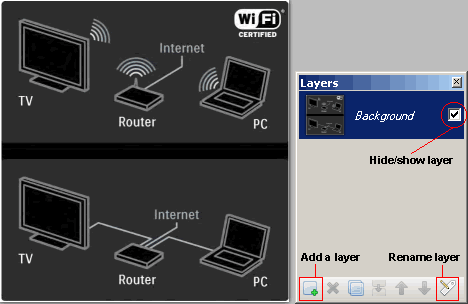
Figure 2: Our image and the Layers panel
When you create an image in Paint.NET, it has only one layer called 'Background'. All the layers are transparent at the beginning, so if you have something in the background layer and add on top of it ten more layers, you will still see the background layer. When you draw something in any of the layers, however, some of the things in the layers below will no longer be visible. We will use this very principle: above the Background layer we will create another layer (called Mask) to hide the text of the Background layer, and at the top we will create yet another layer (called Text) where we will put the translated text.
Now, let’s create those 2 layers we were talking about:
- To create a layer, click the small icon with the green cross [see Fig. 2] or click Levels -> Add Level. The layer is inserted above the current selected layer.
- To change the location of the new layer, select the layer in the Levels panel and use the iconsMove Layer Up (
 ) and Move Layer Down (
 ).
). - To give the new layers descriptive names, select a layer in the Layers panel and click the small icon with a pencil [see Fig. 2], double-click the layer or select the menu Levels → Property level....
We call the layer above the background layer Mask, and the layer below it 'Text'.
When we are done, your Layers panel should look something like Figure 3 below:
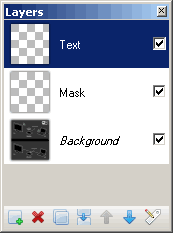
Figure 3: Layers panel after adding 2 new layers
Note: Read the section on Advanced Techniques for more information on working with layers in some images.
3. Enter the translation in the text layer
At this point you are probably wondering: when will I start translating? Well, we have prepared the ground, so now let’s start the show!
Working with text is pretty easy:
- Use the Pick Color tool to choose the right text color from the original image in the Background layer;
- Select the layer that you designated for text;
- Choose the Text tool in the Tools panel and click in the image;
- Enter text, trying to match the original text formatting closely;
- Correct typos, inconsistencies, etc. during the proofreading stage.
Let’s break down each of the steps above. For example, we will translate the word 'Internet' in our sample image:
-
Use the Pick Color tool to select the right text color from the image.
Before you add a text block, you need to tell Paint.NET what color it needs to use to format the text. Unfortunately, it is quite difficult to change the text color when you have already typed some text, so we’ll pick the right color before adding the text.
Select theColor Picker toolfrom the Tools panel (the green eyedropper icon
 ). Go to the Background level (where the original colors are preserved). To zoom in on a particular area, use the plus and minus keys (
 ) in the toolbar or turn the mouse wheel up or down while holding down the Ctrl key. Finally, click over the color you would like to use for the text. The Colors panel should change like this:
Figure 4: Use the Get Color tool to select color from the original imageTips:
- If the color of the text you are about to add is already present in the Colors panel below, you can simply select that color from there [see Standard/Custom Colors area in Fig. 4];
- If your image has only a few colors and you need to translate numerous blocks of text, you can add all those colors to the standard palette by selecting a color with the Pick Color by clicking the 'Add Color to Palette' button in Fig. 4, and then clicking one of the colors in the standard color area. This will allow you to choose those colors quickly.
-
Select the layer that we have designated for text
As soon as you have finished editing a block of text in Paint.NET, that text will “overwrite” whatever is stored in the same layer (to use graphics program terminology, text is rendered or rasterized). That is why it is very important to choose the right level in the Levels panel before adding the text. Remember: always make sure you have selected the right layer (possibly the layer intended for text) in the Levels panel, or you risk overwriting something (which you can, of course, undo).
-
Make sure that nothing is selected in the image
When a part (surrounded by a moving dashed line) has been selected, the Text tool treats this area as a work area. In other words, only the text located inside the selection will be visible.
If you type the text and see nothing, do the following: choose Edit -> Deselect or click
 in the toolbar.
 -
Choose the Text tool from the Tools panel and click in the image.
-
Once this is done, a flashing cursor will appear with a cross icon next to it.
Paint.NET always remembers the formatting you used for the previous text block, so if you have 2 or 3 different types of formatting in the image, it is a good idea to add all the text blocks with one type of formatting, and then the text blocks with another type of formatting, etc.
-
Enter text, trying to match the original text formatting closely.
You can change the formatting of the entire text block at any time while you are editing it using the Text tool’s property bar.
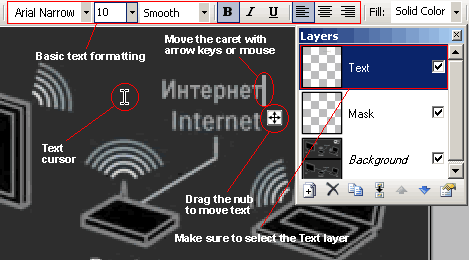
Figure 5: Editing the textYou can also move the text by dragging the cross-shaped icon in the lower right corner of the text (press the Ctrl key if you cannot see this icon).
The text editor in Paint.NET is quite basic. If you make a typo, use the left/right keys to go back to the mistyped text, or click the mouse where you want to modify something. To delete letters, press the Delete or Backspace button.
Check the text for typos, etc., and then position it right where you want to see it in the translated version (it will be above the original text). Click outside the text block and it will become rendered on the current layer.
Tips:
- You can also use the Colors panel to change the color of the text as you are editing it;
- Paint.NET does not support formatting individual letters, so you will have to outsmart the program by creating several blocks of text;
- To insert a special symbol (e.g., the degree or euro symbol), use one of these methods:
- enter the symbol in Microsoft Word or another word processor, copy it to the clipboard, and press the Ctrl+V combination to paste it into the text editor;
- enter the symbol using the numeric keypad located on the right side of your keyboard (this method works in all text editors). For more information, please see this page.
-
Correct the text after it has been rendered
-
Suppose we made a typo in the word 'Internet' (damn keyboard!). To correct it, you need to erase the text and type some new text instead. To do this:
-
Select the layer where the text is located (i.e., the Text layer);
-
Select an area around the text using the Rectangle Select tool (
 ):
):
Figure 6: Select with the Rectangular Selection tool -
Press the Delete key to delete everything inside the selection;
-
To erase individual areas, select the Eraser tool (
 ) from the Tools panel, set the appropriate brush width from the Eraser properties bar, and give the text a couple of strokes to erase it. I advise you to make a selection first to avoid accidentally erasing some other text in the same layer.
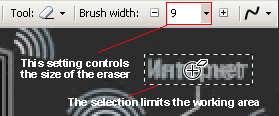
Figure 7: Using the Eraser tool -
Reset the selection by choosing Edit -> Clear Selection or by clicking
 on the toolbar. This step is important because if you leave an area selected, other operations you perform on the image will be limited by this selection.
-
-
If you want to move text that has been rendered:
-
select the Text layer;
-
select the area around the text using the Rectangle Select tool (
 );
); -
select the Move Selected Pixels tool (
 ) from the Tools panel;
 -
place the mouse cursor inside the selection, click the left mouse button, and drag the selection to another location:

Figure 8: Use the Move Selected Pixels tool
-
-
If you wish to insert rotated text, read the Advanced Techniques section.
Sometimes you may insert text in a wrong layer. Unless it is the Background layer (in which case I would advise you to undo the last action), you can use the Rectangle Select tool ( ) to select the area around the text, then click Edit → Cut, select the right layer and click Edit → Paste. If you need to move text, place the cursor inside the selection, click the left mouse button, and drag the selection to a new place.
4. Edit the mask layer to hide the original text and adjust the background of the original text
So, we have finally translated the text, but the original text is still visible underneath our translation. We will hide this text by painting the Mask layer (which is right between the Text layer and the Background layer)
To accomplish this:
-
Choose the background color of the text from the original image: select the Background layer, activate the Get Color tool, and click on the background of the original text to copy the color to the Colors panel;
-
Select the Mask layer in the Layers panel. Again, be careful not to select the Text or Background layer ;
-
use the Rectangle Select tool (
 ) to make a selection around an original block of text. It is always recommended to make a preemptive selection using other tools to prevent something else that is in the same layer from being overwritten;
 -
Use one of the following actions depending on the background of the text:
-
If the background of the text is uniform, select the Bucket tool (
 ) and click inside the selection to fill it with the color present:
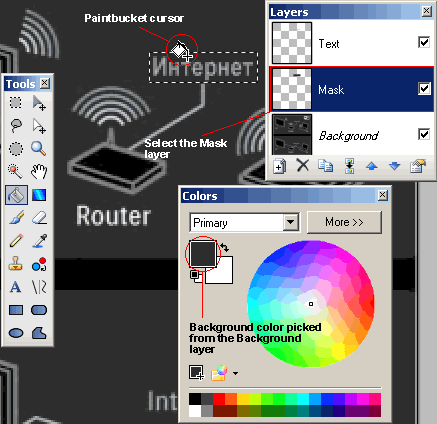
Figure 9: Use the Bucket tool to modify the Mask layer -
If there are multiple colors in the text background, you will need to use the Brush (
 ) or the Pencil (
 ). Use the Pencil to paint individual pixels with a specific color. The Brush is more versatile: you can change the size of the brush and use it to create blurred transitions with the original background when the text background is complex. Experiment with these tools to see the benefits of each one.
-
5. Save the file
Congratulations! You are only a few steps away from putting the image in the translated document. We now need to save the file in a format supported by your word processor.
Before doing this, it is a good idea to save the image in Paint.NET format. In this way, you can more easily make corrections to the image since the file saved in this format will contain all the layers you have created. In Paint.NET, click File →. Save, select a folder to save to, type in the name of the image, and finally select "Paint.NET (*.pdn)" from the Save As* list before clicking the Save button.
Now, we save the image so that it can be inserted into the translated document. Click File → Save As... and choose "PNG" or "JPEG" from the Save As list before clicking the Save button.
-
For a PNG file, a Save Settings dialog box will appear. In this dialog box, choose "24-bit ", "32-bit " or "Automatically detect" and click OK:
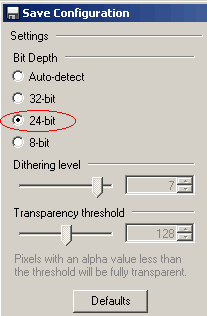
Figure 10: PNG file settings -
For a JPEG file, a Save Settings dialog box will always appear. Select high quality (90-95 %) if file size is not an issue for you. Otherwise, decrease the quality until the file size is small enough and the image preview satisfactory.
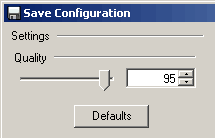
Figure 11: JPEG file settings
When you press OK in the Save Settings window, you will see a dialog box asking if you want to "Merge Layers" of the image. PNG and JPEG formats cannot store individual layers which you created, so all the layers need to be merged together. The image will look the same, but will contain only one layer. Click 'Merge Layers' to save the image:
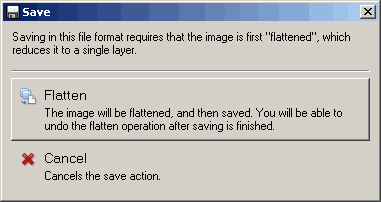
Figure 12: Image layer merge warning
Now, you will see that the Levels panel contains only one. At this point, you can make further changes to the image (open the PDN file you saved earlier or cancel the last layer merge action) or enter the PNG/JPEG image into the word processor.
6. Enter the file into the word processor
As the last step, we will need to insert our image (which we now have in PNG or JPEG format) into the final document.
Microsoft Office document (Word, Excel, PowerPoint, etc.):
- Office 2003 or earlier versions: click Insert→ Image → From file...;
- Office 2007 or later versions: click Image from the Illustrations group in the Insert tab);
OpenOffice document (Writer, Calc, Impress):
Click Enter → Image → From file...
Advanced techniques
In this section, you will learn some advanced techniques for translating images using Paint.NET.
Insert rotated text
Sometimes you will need to translate rotated text (e.g., text flipped vertically at 90 degrees like labels, etc.) Follow the steps below to insert this type of text into our images:
-
Insert a new layer on top of the pre-existing Text layer. It must be a new layer because we will need to rotate it.
-
Select the new layer and type the text in the center of the image using the procedure explained in step 3 above.
-
Click Levels → Rotate / Zoom...
-
In the Rotate / Zoom dialog box, type 90 (for text that will be read from bottom to top) or -90 (for text that will be read from top to bottom) in the Angle box and click OK:
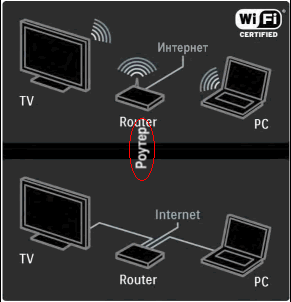
Figure 13: Text rotated 90 degrees -
select an area around the rotated text, then select the Move Selected Pixels tool (
 ) from the Tools panel, and drag the text to its new location.
Working with transparent images
Sometimes when you open an image in Paint.NET or copy it from the clipboard, something like this will appear:
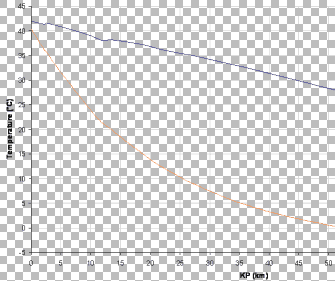
Figure 14: An example of a transparent image
The checkered background means that the image is transparent in those areas. If this is the case, follow this procedure:
-
Insert a new layer below the 'Background' layer. To move the layer below the Background layer, select the new layer and click the Move Layer Down icon (
 ) on the Levels panel until the layer is below the Background layer.
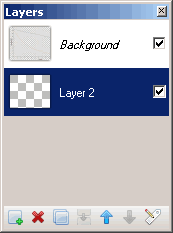
Figure 15: Layers panel of a transparent image -
Select the new layer in the Layers panel and use the Bucket tool (
 ) to fill the entire area with white color (for details on how to do this, read the following sections). The background of the image will turn white.
Comparison of image editing software
At the beginning of the article I promised to offer you a comparison of some image editors. Well, here it is. This may be a bit subjective, so I strongly encourage you to install these programs and check for yourself.
Paint.NET
Free, Windows
Rating - 6
Benefits:
- Clean, intuitive interface
Disadvantages:
- Text layers are not supported (i.e., text cannot be edited after processing, and such texts overwrite other parts of the layer)
- Elementary text editor (only a few keys can be used to edit text)
- Small caps, all caps - not supported
- Formatting of individual characters not supported
- Some advanced text formatting features (e.g., kerning) are not supported
Promises:
- Since version 4.0, text layers have been announced. This will make it possible to modify text at any time
GIMP
Free, Windows / Linux
Rating - 5
Benefits:
- Free and open-source application
- Available for almost all known operating systems
- Text objects are independent of their level
- The text supports line spacing
Disadvantages:
- Text layers are only partially supported: cannot be edited after processing, but unlike Paint.NET they do not overwrite the underlying image in the layer
- Elementary text editor (only a few keys can be used to edit text)
- Small caps, all caps - not supported
- Formatting of individual characters not supported
- Some advanced text formatting features (e.g., kerning) are not supported
Corel PaintShop Pro 2021
69.99 USD, Windows, 30-day trial
Rating - 7
Benefits:
- The text can be changed at any time
- You can rotate the text easily
- Presents some advanced text formatting features: letter spacing (kerning)
Disadvantages:
- Formatting of individual characters not supported
- Fairly basic text editor
- Small caps, all caps - not supported
- The program is optimized for photo editing, which makes it a bit difficult to use for translation
Adobe Fireworks CS4
299 USD, Windows and Mac OS, 30-day trial
Rating - 10
Benefits:
- Excellent text editor
- The text can be changed at any time
- Single character formatting supported
- You can rotate the text easily
- Features many advanced text formatting functions (line spacing, letter spacing, etc.)
Disadvantages: Practically none
Verdict: If you need to translate a lot of images frequently, I highly recommend spending your money on Adobe Fireworks CS4 because of the speed and flexibility it will offer you compared to other products. However, if you translate images from time to time, I would recommend Paint.NET.
Note: Adobe Fireworks is no longer developed by Adobe.
*Congratulations
You have just learned how to use Paint.NET to translate text contained in images.
Although Paint.NET is somewhat different from other graphics editors, the techniques covered in this article are applicable to other programs as well.
To practice, use the following links to download the image used in this tutorial and the tutorial itself in PDF (in English):
Download PDF tutorial (in English)
If you have images to translate and need help, [contact us without obligation](/contact us)


